"In this classroom, relationships are fostered, families are respected, and children are honored.
In this classroom, nature's gifts are valued and children's thoughts are captured.
In this classroom, learning is alive and aesthetic beauty is appreciated." -Unknown

Wednesday, September 5, 2012

Post-It Personalities


Last fall I had the privilege to go on a trip called Directors on the Move. We went to the Monterey area and visited several locations to find inspiration. We visited the Monterey Peninsula College Lab School and definitely found loads of ideas. You can view the album on my Facebook page at: https://www.facebook.com/media/set/?set=a.197037990407742.37877.170943436350531&type=3  One of the things I immediately decided to try in my own classroom was what we've decided to call Post-It Personalities. I knew I wanted to do it at the beginning of the school year and posted it for the first time at our Back to School Night/Parent Information Meeting. The photo below shows the directions given at the lab school. Mine were handwritten as I ran out of time with all the other preparations for the evening. 

After signing-in for the evening, parents were given this assignment:  


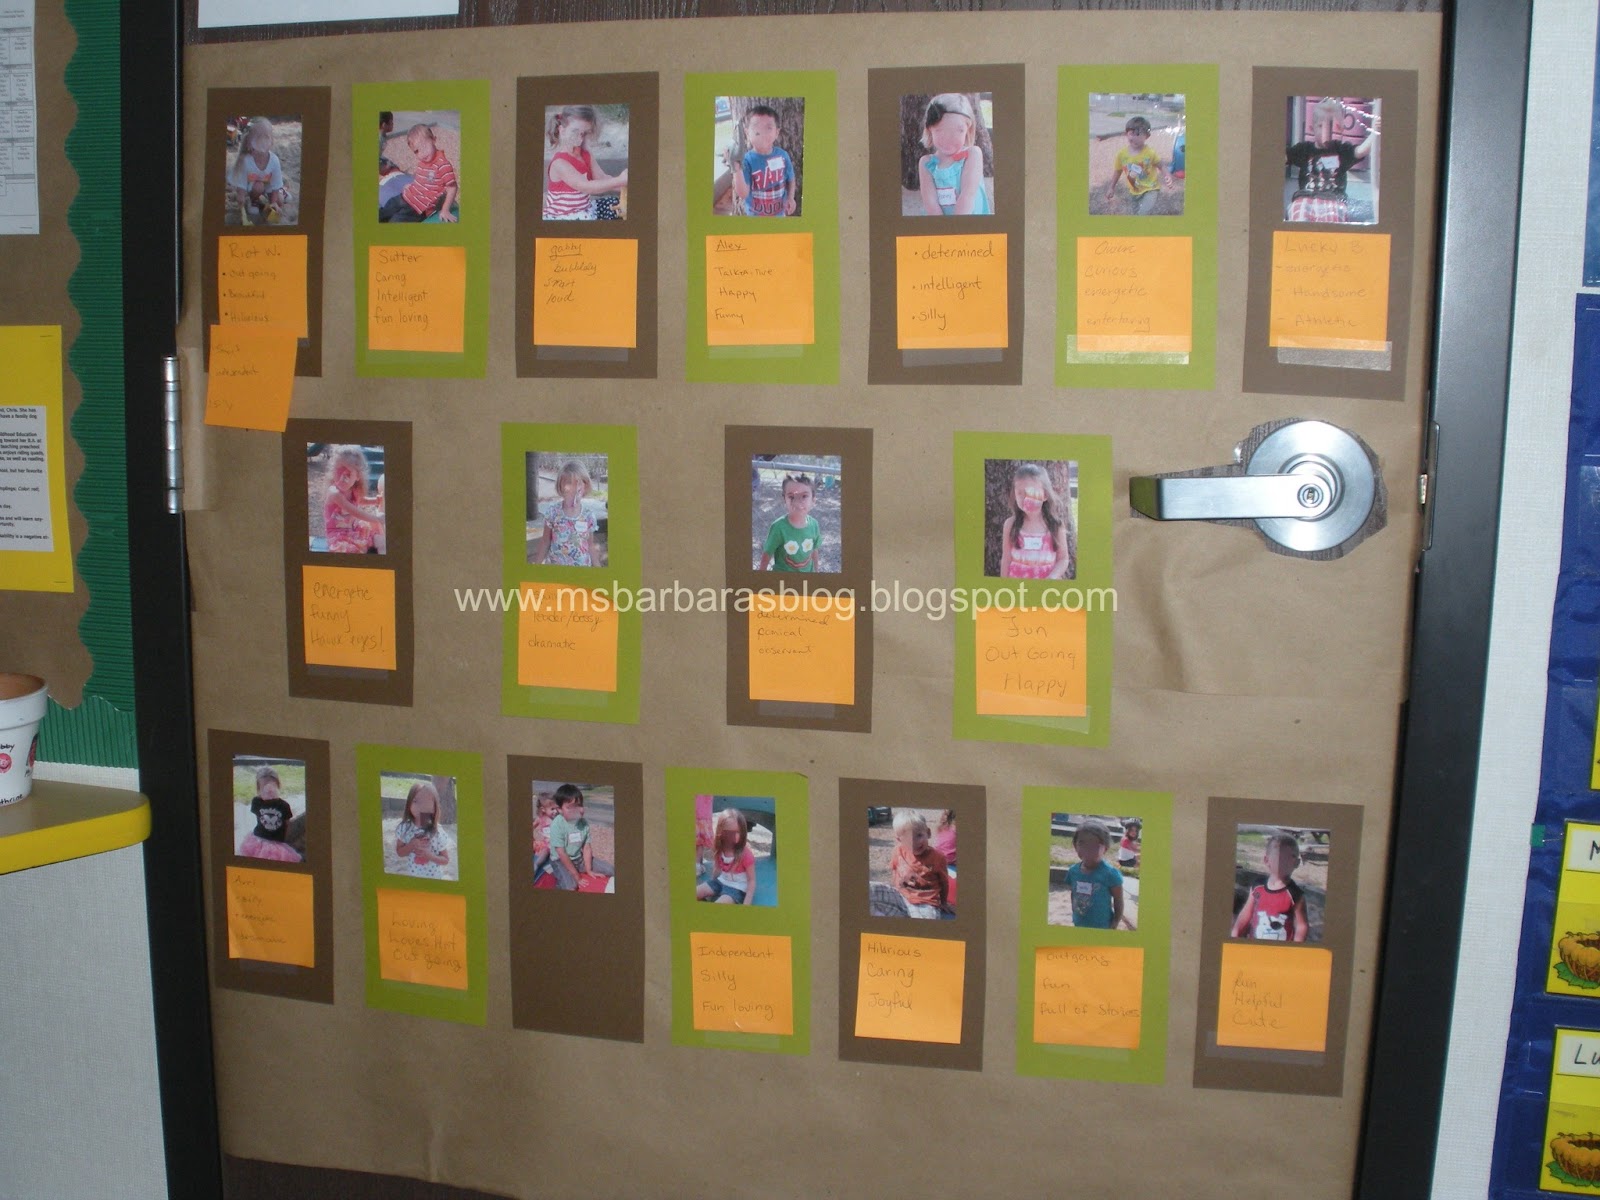
This is the full view of the display. I always take a beginning of the year photo of each child on our first full day together. This photo gets used in the child's cubby, in a class memory game, on a namecard in the Writing Area, and in the end of the year slideshow. This time I also used it for this display. I matted the photos on either a dark brown or olive green piece of cardstock that I had measured to leave enough room for the Post-It Note. I adhered kraft paper to the door and matted the photos.

The first thing I love about this is that it caused the parents to pause... and really think about how to describe their child's personality in three words. Some parents did it pretty quickly, which was perfectly fine. Others talked together to try to find out which three words described him or her the best.


Here are close-ups of a couple of the Post-Its.


How they chose to list the words were entirely up to the parents. Some put bullets, some just wrote three words, and some wrote the child's name along with the three words. 


The other thing I love about this activity is the excitement when the children saw their photos on the door the next day and when they heard what their parents had said about them. Joy!!

What special things do you post or set-up for the beginning of the year?


Wednesday, August 29, 2012

Getting Ready for the New School Year; Setting Up the Physical Environment


Each year organizing, setting up and getting ready for a new school year is always an adventure. During the course of the year things get so busy that things don't stay super organized. My first year teaching one of the parents was teasing me and commented that my office was a disaster. I told her that my office was a disaster and I could keep it neat and orderly all the time and not do all the wonderful learning experiences I offered to her son or my office could be chaotic and we could do lots of fun stuff. She laughed and told me that she didn't care what my office looked like, not to change a thing about the program. 

Having said all that, of course I do like it to be neat and orderly when possible, so during the summer program or prior to the new school year starting in the fall, I always try to organize things. This makes it feel like a fresh start and is a great way to inventory just what we have available.


These are storage cabinets in the classroom.
Having all of our collage and stamping materials
sorted helps us know what we have available
and what we may need to replenish.

Love putting the construction paper in rainbow order with
skin tones on the end. We purchase the 12 x 18 packs and
I cut them in half for our daily use.

Hard to believe that when I began here there were virtually NO books.
Probably 95% of the books are mine
and have been purchased through Scholastic.
 I went through all the books and reorganized them.
There is actually almost one full shelf on the backside
 with Science/Nature Non-fiction books, as well.

These are the cubbies by the front door. I do put each child's
name and a photo in their cubby. I also post photos I or someone
else have taken with inspirational quotes around the room.

Here's the Manipulative Area for the beginning of the school year.
There are Ocean Animal finger puppets on the top of the shelf
 along with a marble maze. Puzzles, shape stackers,
Magna Tiles, Connecting Pieces, and Potato Head People.
 

I transformed our train table into a base for the dollhouse and firehouse.

This is the view from the other side.

Got the Block Area ready. Hollow blocks, block area people,
beaded blocks, colored window blocks, forklift.

The Writing Area is almost ready. I have large crayons on order.
I will add another small shelf on the bottom left that will have paper with lines on it.
 

Colored rice in the sensory table with magnet wands
and little color plastic discs with metal bands around the edges.

They run the wands through the rice and it pulls all the color discs to them.
Then they pull them off the wand into the bowl.
 From the bowl they get poured back and mixed into the rice.


Dramatic Play is a Bistro/Restaurant: cash register, phone, dolls,
pizza set, sandwich set, customer clothes, and work clothes.
 

The Dramatic Play provocation. I'd want to sit down and play.
An overview of the Dramatic Play area. 

Working on the Art Area. Will fill the tape dispenser with
the colored tape coming from Discount School Supply.
There are wooden sticks/stars, different sized pompoms,
felt shapes, glue, crayons, colored pencils, colored paper,
 foam letters, punches, calculator paper, scissors, and colored tape.
Will add construction paper and stiff paper for bases.
As you can see from the other interest centers,
 I don't usually put out plastic tubs.
I prefer baskets and wooden containers.
However, in the Art Area I want them to be able to see what is available.

These are a couple of the provocations that I put out to
inspire creativity based on the items available on the art shelves.


This is the beginning of the year library shelf.
I try to keep it minimal, so it won't be overwhelming
and try to include books about animals, colors, children,
numbers, a current theme (ocean) and comfort.
I try to make sure diversity is shown of cultures, ages, abilities,
and the like. We have books in the library, the reading loft,
 and in a basket in the room, as well as in a variety of areas around the classroom.

Science Area table: Books, shells, posters, starfish,
abalone shell, driftwood, Ocean Life chart.

The rest of the Science area focused on Ocean Animals:
 shells galore, ocean finger puppets, field guide,
nature observer, and block puzzles. Oh, and don't
forget the aquarium with live fish.


I have three of these magnetic books,
but in the original format only one child
at a time can play with them and I wanted it to work for two.

I color-copied some of the pages, laminated them,
and taped them on the side of the file cabinet AKA our Magnetic Board.
The face parts are stored below in the wooden box for them to peruse.

So excited about the light table. Found the glass bowls at the Dollar Tree.
 Purchased the translucent shapes from Discount School Supply.
 Found a double-sided adhesive and adhered a shape
on the side of each bowl then spread out others for sorting.

I'm trying to keep the wall items limited to natural colors and meaningful.
I ordered this kraft paper and trimmed it with green corrugated border
 behind our helper chart and calendar.

Our 3 Classroom Rules: Be kind. Be safe. Be neat.
Everything else kind of falls under those three.

Our Science Area is set up with Ocean Things
 to begin the school year so I posted some ocean pics/words.

ASL chart and Number Chart

Here's the room from several angles. From the front door.

From the group area. 
The completed Parent Board is
pictured below.

From the back wall by the sink

From the right corner in the Science Area

From one side of the room...

and the other side.
This is our Parent Information Board. I used more of the
kraft paper with a green corrugated border  to keep with
the natural colors. It includes our daily schedule, our
yearly calendar, our weekly curriculum plan, our
monthly classroom set-up, our monthly calendar,
our monthly lunch calendar, and staff bios.
You can see our digital frame that we keep going
all during class time.


A new year is always so exciting. I love seeing how much my old friends have grown over the summer and getting to know our new friends. I love having the room set up in a way to be inviting and engaging when they step in the door. Let the year begin!!


Thursday, August 23, 2012

Helping Children Understand the Value of Their Words


I have a very strong belief that a child’s words are valuable and that when they realize it, they will take ownership of them and discover a new found pride in them. One way that I do this is through Sticker Stories. I take a brightly colored 8 1/2” x 11” piece of paper and cut it in half. I then provide some stickers, usually about a theme we’re studying or something that’s been particularly interesting to the kiddos. This past summer we did a whole month on Dinosaurs and there was LOTS of interest. When we did sit down with lots of stickers they had prior knowledge about dinosaurs, so it was also a great way to check their comprehension of what we had been learning. Each child chose three stickers and placed them at the top of the paper. I had the child sit beside me, since I’m right-handed, I had them sit to my right so I they could see the letters being formed correctly as I wrote the words. I then wrote down what they said EXACTLY as they said it. If the mispronounced words or used incorrect grammar, it didn’t matter. The important part was writing EXACTLY what they said, thereby reinforcing how valuable their words are. It’s also important for the adult to write in their best teacher/preschool print so the letters look like the ones the children see in the environment and in books. After they concluded their story, I read it back to them, running my finger under the words. This is a great way to show them the left to right progression of words in the English language.


You will notice that I only capitalized the proper words and all other letters are lowercase. This is something that is VERY important to do with small children. Sadly, many parents and other adults write children’s names with the letters in all caps. This can confuse children when educators try to show them how their name looks in writing. They are convinced that all caps is the correct way. It would be a much easier progression in the learning process if we could all get on the same page.


When we have group time I place the letter carpets out for the children to sit on. I place them so that children walking up to the group will see each letter right side up. It’s just another way to ensure they are learning the correct orientation of the letters. 


Back to reinforcing the value of their words, at our last group time of the day I have each child come up to the front of the group, if they are comfortable doing so. Prior to this we have discussed the role of an author and an illustrator. I tell the children that this child is the author of this story. The child stands there as I read their story to the other kiddos. When the story is complete we all acknowledge it with a polite golfer’s clap (small and quiet claps beside the face). You should see the pride and joy on the face of the author during this time. Another level of this activity would be for either the teacher or the child to choose other kiddos to be the actors in story as it’s being read.


Recently we’ve added a new dimension to the activity. Over the summer I visited the beach and acquired some smooth stones. I brought them home, washed them, then placed stickers and fabric pieces on them with Mod Podge. You can see the variety on our Facebook page at: https://www.facebook.com/photo.php?fbid=262539450524262&set=a.184452911666250.34612.170943436350531&type=1&theater


I then placed them on a raised wooden plate and put them in the writing area. 


Today the kiddos began asking about them. I explained to them that they could take 3 to 5 stones of their choosing and tell me a story that I would write down for them. After they finished their story and I read it back to them, I took a photo of the stones they had chosen. We’ll read the stories and share the photos at group time, but I also plan to post them in the room and make them part of their portfolio.


Another thing I do that reinforces the value of words is our photo of the month. I take LOTS of photos!! I’m sure you’re all shocked to hear that. lol At the end of each month, I choose one photo of each child, print it out in a 4x6 format, and mat it on an 8 1/2” x 11” piece of cardstock. Then I sit with each child and ask them to tell me what they were doing in the photo. I write down whatever words they say along with their name and the month and year. The next month I do the same, just flipping the cardstock over to use both sides. These pages are displayed in sheet protectors on the back of our shelving units for families to enjoy and are sent home in each child’s portfolio at the end of the year. This not only shows their physical growth, but allows the parents to see the growth of their language skills, as well.


As you can see, I’m very passionate about instilling a sense of ownership of their words to each child. Words are powerful and what a great way to impress that power to them at such a young age.